

 printer friendly version
1.1 Photometric Pipeline(4): Illumination Correction
1.1.1 Characterising the illumination variation
1.1.1.1 Using a pre-cooked recipe
Deriving the characterisation of the illumination variation from the awe-prompt using a pre-cooked recipe is done thus:
   1. awe> from astro.recipes.IlluminationCorrectionVerify import IlluminationVerifyTask
   2. awe> task = IlluminationVerifyTask(raw='WFI.1999-06-18T06:02:14.059')
   3. awe> task.execute()
To get detailed information about the use of the task, type:
awe> help(IlluminationVerifyTask)
which will, for example, show the parameters that can be passed to the
constructor of the task.
1.1.1.2 Using the basic building blocks
A more elaborate way of deriving the characterisation of the illumination variation is by using the basic building blocks of the photometric pipeline themselves. An illumination variation characterisation can be derived from the basic building blocks as follows:
  1. awe> from astro.main.IlluminationCorrection import IlluminationCorrection
  2. awe> from astro.main.PhotSrcCatalog import PhotSrcCatalog
  3. awe> from astro.main.RawFitsData import RawFitsData
  4. awe> raw = (RawFitsData.filename == 'WFI.1999-06-18T06:02:14.059.fits')[0]
  5. awe> query = (PhotSrcCatalog.date_obs == raw.DATE_OBS) &\
     ...          (PhotSrcCatalog.is_valid == 1)
  6. awe> len(query)
     8
  7. awe> photcats = [p for p in query]
  8. awe> illum = IlluminationCorrection()
  9. awe> illum.photcats = photcats
 10. awe> illum.make()
 11. awe> illum.commit()
In lines (1)-(3) the relevant classes are imported, and in step (5) the
necessary dependency is retrieved from the database. In this case, the
dependeny consists of a list of photometric catalogs. Note that, in this
example, the Python equivalent of a join is used to find these. In lines
(8)-(10), an IlluminationCorrection object is instantiated, its
dependency is set, and the make method is called. In step (11), the IlluminationCorrection object is committed to the database.
1.1.1.3 Configuring the illumination correction
Any IlluminationCorrection object has a knob that allows the user to configure the behaviour of its make method. To get information about the available configuration options, just type:
awe> illum.process_params.info()
which will show the available configurable parameters, their meaning, and their
default setting.
1.1.1.4 Inspecting the characterisation result
To view the result of making an IlluminationCorrection object, simply invoke its inspect method:
awe> illum.inspect()
which will result in an output to screen that looks like the one shown in
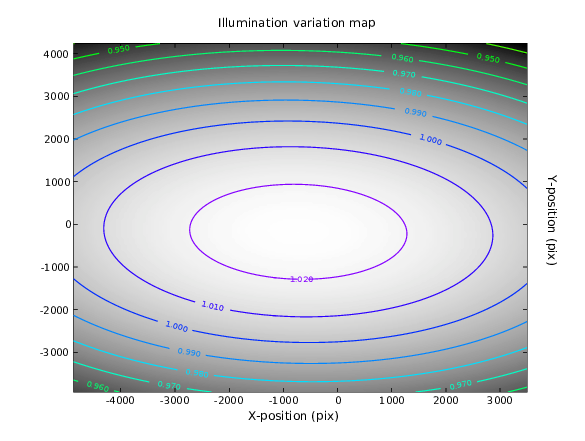
Figure ![[*]](crossref.png) . The inspect plot shows the result of
the overall fit to the zeropoints as a function of their position on the complete detector block. Super-imposed on these are some relevant contours.
The units on the contours are linear, as is the case for the fit shown on the
background. The vertical and horizontal axes give the pixel position on the
detector block. The inspect method of course also functions on IlluminationCorrection objects retrieved from the database.
. The inspect plot shows the result of
the overall fit to the zeropoints as a function of their position on the complete detector block. Super-imposed on these are some relevant contours.
The units on the contours are linear, as is the case for the fit shown on the
background. The vertical and horizontal axes give the pixel position on the
detector block. The inspect method of course also functions on IlluminationCorrection objects retrieved from the database.
1.1.1.5 Inserting an illumination correction map into the system
To insert an external illumination correction map for a certain filter and instrument into the database, a simple tool is available. This tool is located in the ./awe/astro/toolbox/photometry/ directory and is called ingest_illuminationmap. To get information about how to use the tool just type:
awe $AWEPIPE/astro/toolbox/photometry/ingest_illuminationmap.py
and a doc-string will appear on screen. The tool only accepts input for a
filter/instrument combination that is actually present in the database. If a
certain filter or instrument is not present, the tool refuses to comply. The
external map provided should, of course, adhere to the mathematical
structure used by the system.
1.1.2 Creating an illumination correction frame
The illumination correction is applied to the pixel data in the image pipeline. This is done using an illumination correction frame that is derived from the illumination variation characterisation. This frame is represented in the system by the IlluminationCorrectionFrame class. The following sub-sections describe the two ways in which such frames can be produced from the awe-prompt.
1.1.2.1 Using a pre-cooked recipe
Deriving an illumination correction frame from the awe-prompt using a pre-cooked recipe is done in the following way:
   1. awe> from astro.recipes.IlluminationCorrection import IlluminationTask
   2. awe> task = IlluminationTask(date='2003-02-11', chip='A5382-1-7', \
      ...                          filter='220', instrument='WFC')
   3. awe> task.execute()
To get detailed information about the use of the task, type:
awe> help(IlluminationTask)
which will, for example, show the parameters that can be passed to the constructor of the task.
1.1.2.2 Using the basic building blocks
A more elaborate way of making an illumination correction frame is by using the basic building blocks of the photometric pipeline themselves. The most common way of deriving an illumination correction frame using these builing blocks is given here:
   1. awe> from astro.main.IlluminationCorrectionFrame import IlluminationCorrectionFrame
   2. awe> from astro.main.IlluminationCorrection import IlluminationCorrection
   3. awe> from astro.main.Chip import Chip
   4. awe> illum = IlluminationCorrection.select(date='2003-02-11', filter='220', \
      ...                                        instrument='WFC')
   5. awe> chip = (Chip.name == 'A5506-4')[0]
   6. awe> illumframe = IlluminationCorrectionFrame()
   7. awe> illumframe.illuminationcorrection = illum
   8. awe> illumframe.chip = chip
   9. awe> illumframe.set_filename()
  10. awe> illumframe.make()
  11. awe> illumframe.store()
  12. awe> illumframe.commit()
In lines (1)-(3) the relevant classes are imported, and in steps (4) and (5)
the necessary dependencies are retrieved from the database. In lines (6)-(10),
an IlluminationCorrectionFrame object is instantiated, its dependencies
are set, and the make method is called. In steps (11) and (12), the IlluminationCorrectionFrame object is stored on the fileserver, and then
committed to the database.